I am not really one to talk. I just got a greenhouse, a massive expenditure that will potentially take me years to make pay off. Still, I am also planning to use said greenhouse to grow year round salad greens, and potentially increase my growing season enough to grow borderline crops for my area including luffa sponges and specialty cucumbers.
Anyway, back on topic. There are a LOT of ways to reduce cost in gardening, making your own compost, setting up your own vermiculture, starting your own plants, and perhaps most simply, not buying fancy (and expensive!) garden supports for your plants. You can build a decent garden support out of just about anything and by taking your garden vertical you can maximize a minimum of space. Here are my basic instructions for making an A-frame style garden support on which you can grow just about anything from beans, peas, and cucumbers to melons, pumpkins, and squash.
Material List:
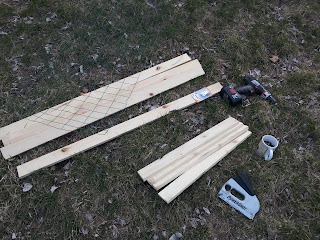
3 8-foot long 1x3, sold as furring strips at my local hardware store
chicken wire or woven wire fence, 24 inches wide (buy this in large rolls for the best deals, especially if you plan on making a number of these)
A staple gun and staples
A drill/screw gun (optional but makes things a lot quicker and easier)
A circular saw or small reciprocating saw to cut down boards (or for a small fee you can have them cut at most hardware stores that sell lumber)
2-2 inch light strap hinges
Screws (I used 1 1/2 inch drywall screws I had on hand, but you can use just about anything that is long enough)
Cut two of the eight foot long boards into two 4 foot sections. Cut the remaining board into four 2 foot sections for a total of 4-4 foot boards and 4-2 foot boards. Use two short boards and two long boards to make a rectangle. Make sure the short boards are attached on the same side of the long boards (don't have one attached on the 'inside' and one on the 'outside'). See picture below for a better description.
This picture is showing what will be the inside of the frame facing up. Notice the short boards are attached on top of the longer boards from this direction. The hinges will also be attached to the inside of the frame. Assemble the second side of the frame and lay the two sections out on the ground, top to top. Attach the hinges to the short board at the top of each side of the frame. Again, see pictures for clarification.
Cut the fence in length so that it will fit along the length of the long boards between the two shorter boards. Lay the fencing out and staple into place as you go so you don't end up with any bunching or kinking that may create slouches when the support is in use and has weight on it. Staple at least twice at top and bottom and in the middle for a total of 6 staples per side. You can use more than this but that is bare minimum.
Now, set the frame up wherever you want to use it! You are done. These are easy to make and cheap to make. They are also surprisingly durable. I have some I made three years ago that have never come inside. They have stayed outside through the winter in all sorts of weather, snow, ice, etc. and they are still usable. The wood at the bottom edge of one is starting to show some signs of wear but still completely functionable. They probably would be in even better shape if I had bothered to take them in to the garage for the winter or at least brought them up by the house (they stayed out in the garden beds!). They also have weathered to a nice grey weathered wood that is quite attractive in the garden. You can do all kinds of variations on these with different types of wire fencing and whatever scrap lumber you happen to have around. Have fun and happy gardening!


No comments:
Post a Comment